FOX Inverter - Knowledge Hub
Use this guide to identify and resolve common FOX inverter and battery issues. Click a topic below to jump directly to the relevant instructions.
- 🔗 Reconnection Guide
Step-by-step instructions for reconnecting your FOX datalogger if it loses connection. Includes how to use the FOX app to manually reconnect and restore live monitoring. - 🔗 Common Alert Guide
Explains frequent system alerts such as BMS Charge Require No Reply, Battery Over Voltage, and No Utility, with clear guidance on what each alert means and how to resolve it safely. - 🔗 Shut Down / Start Up Procedure
Details how to safely power your FOX system off and back on in the correct sequence to prevent faults during maintenance, battery expansion, or troubleshooting. - 🔗 Setting Up Charging Schedules for Load Shifting
Learn how to set up FOX Cloud charging schedules to charge during cheaper rate periods and discharge during peak times. Includes guides for both Single Time Charge Setup and Mode Scheduler Setup, depending on your tariff type. - 🔗 Force Charge/Discharge Guide
A walkthrough for how to correctly toggle between Forced Charge and Forced Discharge modes. - 🔗 Battery Warmup Guide
Learn how to enable and configure the internal battery heater to maintain optimal performance and protect your system during low-temperature periods.
Reconnection Guide
Open your FOX app and follow the steps below to reconnect your datalogger.
- Open the FOX app.
- Click Devices at the bottom of the screen.
- Select Accessories and copy your datalogger serial number.
- Return to the Devices screen, tap Me in the bottom right corner, and select WLAN Configuration.
The app will now run a Bluetooth scan. It’s normal if the datalogger isn’t detected — wait until the scan finishes, then tap Input Manually in the top right.
- Paste your copied datalogger serial number.
- Press Connecting Network.
- Tap the picture in the centre to open your Wi-Fi settings.
- Disconnect your phone from your usual Wi-Fi network so the datalogger connection takes priority.
- Connect to the datalogger’s network — it will appear as W-XXXXXXX.
- If prompted for a password, enter mtmt2020.
If you can’t see the datalogger’s network, move closer to the inverter and try again.
- When asked to connect to a network without internet, select Yes.
- Go back to the app and select your home Wi-Fi network.
- Enter your Wi-Fi password, tap Next, then OK.
You can now reconnect your phone to your Wi-Fi.
- Return to the FOX app.
- On the Device page, confirm the datalogger shows as reconnected.
- Scroll down to refresh the page.
Please note: It can take up to one hour for data to reappear after a reconnection.
If it’s been longer than an hour and the issue continues, call us on 01473 727727 for assistance.
Common Alert Guide
From time to time, your system may display an alert. This is usually a notification of an event rather than a fault. Below are some of the most common alerts and how to resolve them.
BMS Charge Require No Reply
This alert means the battery’s charge is very low, causing a temporary loss of communication between the battery management system and the inverter.
What to do:
- Contact Greenscape, who will liaise with FOX.
- FOX will perform a remote update to restore communication.
- Once the update is complete, you’ll be asked to carry out a system shutdown.
- During winter, you may be instructed to set a time charge to wake the batteries. The Technical Support team can handle this remotely if needed.
- After these steps, the alert should clear automatically.
Battery Over Voltage
This alert indicates the battery management system has detected a higher-than-normal voltage within the battery.
What to do:
- Contact Greenscape, who will contact FOX.
- FOX will perform a remote update to stabilise voltage readings.
- Once the update has completed, monitor the system for one hour.
- The alert will clear automatically once normal operation resumes.
Communication Fault Between Manager and Meter
This alert appears when communication between the meter and inverter has been lost — commonly caused by a power cut.
What to do:
- Check the fuseboard installed by Greenscape.
- If any fuses have tripped, push them back to the up position.
- Wait at least 30 minutes for the system to recognise the change.
- The alert should clear automatically once communication is restored.
No Utility
This alert indicates that the system has lost grid connection — typically due to a power cut or following a system shutdown.
What to do:
- If you’ve recently performed a system shutdown, allow at least 1 hour for the alert to clear — this is normal.
- If no shutdown has been performed, check whether there has been a recent power cut.
- Inspect the fuseboard — if any fuses are tripped, push them back to the up position.
- Wait a minimum of 30 minutes for the system to recognise the change.
- Once power and grid connection are restored, the alert will clear automatically.
If any alerts persist after following the steps above, please contact Greenscape Energy for further assistance.
Shut Down / Start Up Procedure
You may need to power your system off or on for several reasons, such as:
- When electrical work is being carried out that requires the system to be turned off.
- When expanding your battery capacity.
- When resolving a fault on the system.
It’s crucial to follow the shutdown steps below in the exact order:
- If your system includes batteries, locate the power button and hold it down until all lights turn off.
- Turn the battery circuit breaker to the OFF position by rotating it anti-clockwise to the horizontal position.
- Isolate the DC side (solar panels) by switching the black/grey isolator to the OFF position.
- Isolate the AC side (batteries) by either turning the yellow/red isolator to the OFF position or flipping the Solar fuse in your fuseboard to the OFF position.
To turn the system back on, follow these steps in reverse order:
- Switch the AC side back ON.
- Switch the DC side back ON.
- Turn the batteries back ON.
- Press and hold the power button on the right side of the battery until the lights turn on.
If you require any further assistance, please call Greenscape Energy on 01473 727727.
Setting Up Charging Schedules for Load Shifting
If you’d like to optimise your system’s performance and reduce your energy bills, you can use the FOX Cloud scheduling tools to control when your batteries charge from the grid. This allows you to load shift — charging during cheaper rate periods and discharging during peak times — to make the most of your variable electricity tariffs.
To learn how load shifting can reduce costs and boost efficiency, visit
🔗 How Load Shifting Can Transform Your Home Energy Use.
There are two methods available for setting up your cloud schedules, depending on how simple or advanced your tariff is:
- 🔗 Single Time Charge Setup
Use this method if your tariff has a single off-peak charging period each day. This simple guide explains how to set one defined time for your system to charge from the grid automatically. - 🔗 Mode Scheduler Setup
Choose this option if your tariff includes multiple variable unit rates throughout the day. The Mode Scheduler allows you to create intricate charging and discharging schedules that align with your energy provider’s changing rates.
If you’re unsure which method is best suited to your system or tariff, contact Greenscape Energy on 01473 727727 and our Technical Support team will be happy to advise.
Force Charge/Discharge
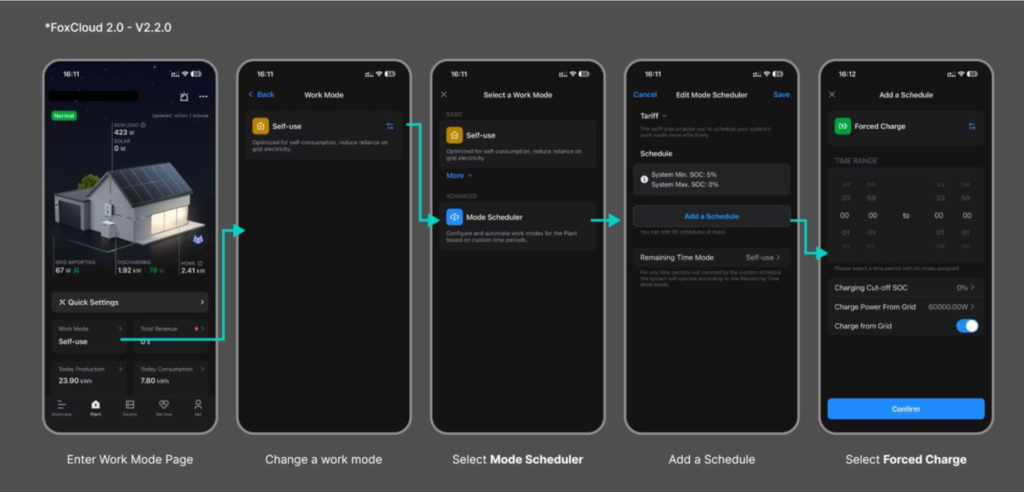
To set up an advanced energy schedule that aligns with your specific tariff rates, you can use the FOX Cloud Mode Scheduler. This feature provides granular control over exactly when your system charges or discharges throughout the day.
Follow these steps to configure your Mode Scheduler:
- Access Work-Mode: On the main page, select Work-Mode and click the blue arrows on the right-hand side.
- Initialize Scheduler: Select Mode Scheduler from the menu and click Add a Schedule.
- Define Parameters: Select your desired start and end times, then click Continue.
Important: During the final step of this process, ensure the mode at the top of the screen is set to Forced Charge (to pull power from the grid) or Forced Discharge (if you are setting an export time slot). To change this mode, click the blue arrows on the right-hand side.
If you cannot see the Mode Scheduler option, you can contact FOX directly to request a remote update for your system. You can reach out via the Service Tab in your app or through the following contact methods:
- Contact Number: 020 7052 3472
- Email Address: service.uk@foxess.zohodesk.eu
Battery Warmup Function Guide
Low temperatures can affect your battery’s charge and discharge capabilities. To mitigate this, your FOX ESS battery is equipped with a Battery Warmup function. This allows the system to maintain an optimal internal temperature for normal operation during winter months.
To enable this function through your FOX app, please follow these steps:
- Access Settings: Click Quick Settings on your main screen and select Battery Warmup.
- Enable Power: If the function is not already active, press the Power Button icon.
- Set Temperatures: Set the Start Temperature between 5°C and 7°C, and the End Temperature between 10°C and 12°C.
- Configure Schedule: Set the time slot for 23 hours and 59 minutes (00:00–23:59) and ensure the blue toggle switch is enabled.
- Save: Press Confirm to save your changes.
Note: Setting the time period to 23:59 does not mean the heater runs constantly. It simply ensures the heater is “on standby” to kick in automatically whenever the temperature drops below your threshold within that 24-hour window.
If you cannot see the Battery Warmup option, your system likely requires a firmware update. You can request this update by contacting FOX ESS directly through the Service Tab in your app or via the details below:
- Contact Number: 020 7052 3472
- Email Address: service.uk@foxess.zohodesk.eu
Contact us today
Want to get in contact with Greenscape today? Complete the form and our team will be in contact with you shortly. Alternatively you can email us directly.